Organizing electronics parts – Resistors

In order to have electronics parts ready to use in my projects I started to order batches from China. They have the same quality of the components sold here in Brazil and are a lot cheaper.

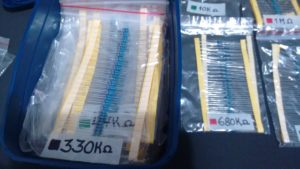
I purchased 2500 resistors (50 pieces in 50 different values). On my first projects I struggled to find the right values due to ugly handwriting in the tape connecting the resistors. I decided to buy some resealable plastic bags (also from China) and classify every single value.

img_20161010_015118826
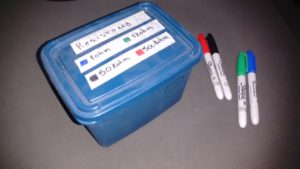
ice cream plastic container and sharpies

My decision was simple and efficient: crepe masking tape and permanent markers. To help finding the values I created four different ranges for the values and defined a color flag to each range. After all that classification I put all the plastic bags in a container.

TResistors in ziplocksoday it’s very easy to source the resistors for new projects. I use the ziplock bags left over in the same way with the sourced components with a label with the project name.

Parsing websites with curl and phpQuery

A while ago I had to crawl some websites to gather information about products. In the past I’ve used RegExp to parse the HTML, knowing it’s not the best method, but I just felt that PHP’s DOMDocument was clumsy.

I started coding the crawler with CakePHP 2.5.x and the following classes: electrolinux/phpquery and php-curl-class/php-curl-class.

The php-curl-class is pretty straight forward, it’s just easier to work with curl with it. In addition, the phpQuery is a library that let’s you use CSS3 selectors just like you do with jQuery.

I know it’s lame, but as example let’s get the title of SaveWalterWhite.

<?php
$curl = new \Curl\Curl();
$curl->get("http://www.savewalterwhite.com");
$pq = phpQuery::newDocument($curl->response);
echo $pq->find('title')->text();
?>

Obviously you can do more complex stuff, like getting all the image paths that are inside list items of the #walter-container div.

<?php
$curl = new \Curl\Curl();
$curl->get("http://www.savewalterwhite.com");
$pq = phpQuery::newDocument($curl->response);
for ($i=1;$i
$pics = $pq->find('div#walter-container li img')->attr('src');
if (!empty($pics)) { var_dump($pics); } 
?>

You can also use the selector on an iteration like this:

<?php
for ($i=1;$i<=$limit;$i++)
{
 $pics = $pq->find('div#product-detail ul li:nth-child('.$i.') a')->attr('data-image-zoom');
 if (!empty($pics))
 {
 $images[] = $pics;
 }
 }
?>

Checkout the phpQuery manual for further information. This class is handy and saved me a lot of time.

Git repository access control with Gitolite

I already used other version control software like CVS and SVN in the past, but Git was one that really got me because I just felt it easy and intuitive.

Besides having a GitHub account I really don’t see the point of paying US$7/month just to have private repositories when you can roll your own VPS for less than that. Obviously, you can install something more similar to GitHub like GitLab, but, in my opinion, Gitolite is easy to use, fast and works; Keep it simple, sucker!

So, I will give the steps to install and configure on Ubuntu Server 16.04. On other distros the paths and steps may differ.

First of all, you should check existing SSH keys or generate a new set on your machine. (To be honest, if you are already using git you should have your keys)

#to check:
ls -al ~/.ssh
#to generate(linux/mac):
ssh-keygen -t rsa

On Windows machines I advise you to install cygwin with net/openssh package. I prefer that way, but you can try with other methods.

Back to our server, now we should install gitolite3 and git-core:

sudo apt-get install git-core gitolite3

Insert your public key configure gitolite. On older versions you need to create a user and run the setup by yourself, keep that in mind if you are using other distro.

Now you can ssh the gitolite user to list the repositories:

ssh gitolite3@yourdomain.com

You can add some rules and keys cloning the gitolite-admin repository.

git clone gitolite3@youtdomain.com:gitolite-admin

You can now add pub keys for other users(or machines) creating files in the keydir directory. For multiple machines you should use the name convention user@machine.pub, like nimlhug@notebook.pub. On the conf/gitolite.conf file you can add users and repositories.

Checkout the official documentation. Apart from being a non resource-intensive, gitolite is a rich and powerful software that you can make use of RegEx, groups, hooks, VREF, wild repos and much more.