Introduction
I have been using Linux for development for a long time and MacOS for quite a few years. The only handful of times that I developed on Windows was for a small fix or adjustment.
The display of my Macbook Pro died back in September and I went back to Linux to develop. Hoping that I would have the Macbook up and running as soon as possible. The repair quotation arrived and, to my surprise, the price was way out of my reality.
I then decided to give it a try to docker-desktop since a coworker from another team had success running our development stack.
(This guide is based on guides, StackOverflow questions, and discussions all over the internet. Unintentionally I may end up forgetting to give due credit.)
Hyper.js + Oh My ZSH as Ubuntu on Windows (WSL) Terminal
(Original: https://medium.com/@ssharizal/hyper-js-oh-my-zsh-as-ubuntu-on-windows-wsl-terminal-8bf577cdbd97)
Install Windows Subsystem Linux — https://docs.microsoft.com/en-us/windows/wsl/install-win10
Install Ubuntu on Windows from Microsoft Store or any other Linux flavor — https://www.microsoft.com/en-us/p/ubuntu/9nblggh4msv6
Install Hyper.js terminal — https://hyper.is/
I went for the hyper-material-theme to set it up press Ctrl + , to bring up Hyper.js configuration file. Look for plugins: [ edit and add the theme.
plugins: [
//"hyper-dracula"
//"hyper-solarized-dark"
"hyper-material-theme"
],
Setup Hyper.js to automatically open Ubuntu on Windows
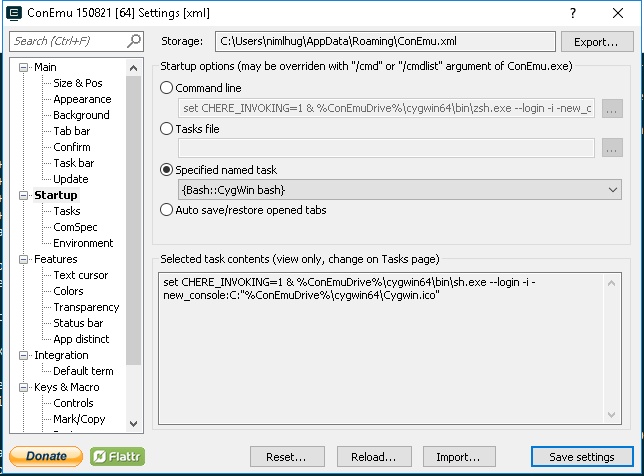
- Open up Hyper.js configuration again and type
Ctrl+, - Scroll down to shell and change it to
C:\\Windows\\System32\\bash.exe
// the shell to run when spawning a new session (i.e. /usr/local/bin/fish)
// if left empty, your system's login shell will be used by default
//
// Windows
// - Make sure to use a full path if the binary name doesn't work
// - Remove `--login` in shellArgs
//
// Bash on Windows
// - Example: `C:\\Windows\\System32\\bash.exe`
//
// PowerShell on Windows
// - Example: `C:\\WINDOWS\\System32\\WindowsPowerShell\\v1.0\\powershell.exe`
shell: 'C:\\Windows\\System32\\bash.exe',
Install ZSH on Ubuntu Bash Windows
- Run this
sudo apt-get install zsh - Open your bash profile
vim~/.bashrc - Add this to set it to use ZSH as default:
bash -c zsh
# ~/.bashrc: executed by bash(1) for non-login shells.
# see /usr/share/doc/bash/examples/startup-files (in the package bash-doc)
# for examples# If not running interactively, don't do anything
case $- in
Install Oh My ZSH
Install Oh My Zsh with
sh -c "$(curl -fsSL https://raw.githubusercontent.com/robbyrussell/oh-my-zsh/master/tools/install.sh)"Restart Hyper.js and you are done!
Docker Desktop, docker-compose, and nvm
Install Docker Desktop
Follow the instructions on https://docs.docker.com/docker-for-windows/wsl/, but it is basically the usual next-next-finish.
Install docker, docker-compose, and nvm
On your terminal install both docker and docker-compose
sudo apt-get install docker docker-compose nvmSpeed things up
zsh is smart with its completions, but it may get really slow and frustrating if you let Windows concatenate its PATH with WSL’s path.
Edit your /etc/wsl.conf with the following:
[automount]
enabled = true
[interop]
appendWindowsPath = false
Besides that, make sure that you are not running docker/node on your mounted hard drive(i.e. /mnt/c/), but instead the WSL filesystem. If you need to access it, with your IDE or editor, use the \\wsl$\ network path.
Running Selenium/Webdriver tests
Install google-chrome inside WSL with your favorite PPA repository. I am not going to teach you this since there an infinity of tutorials on the subject. It may or may not work with chromium, but I didn’t test.
Install Xming/Xlaunch with the notorious next-next-finish https://sourceforge.net/projects/xming/
Create a config.xlaunch file with the following and run it afterwards:
<?xml version="1.0"?>
<XLaunch xmlns="http://www.straightrunning.com/XmingNotes" xmlns:xsi="http://www.w3.org/2001/XMLSchema-instance" <?xml version="1.0"?>
<XLaunch xmlns="http://www.straightrunning.com/XmingNotes" xmlns:xsi="http://www.w3.org/2001/XMLSchema-instance" xsi:schemaLocation="http://www.straightrunning.com/XmingNotes XLaunch.xsd" WindowMode="Windowed" ClientMode="NoClient" Display="0" Clipboard="true" ExtraParams="-ac"/>
On WSL you need to export the DISPLAY variable(I recommend you put it on your bashrc or similar):
export DISPLAY=$(grep -m 1 nameserver /etc/resolv.conf | awk '{print $2}'):0.0You should be able to run Google Chrome by now on your terminal: google-chrome
Don’t forget to install chromedriver:
npm install -g chromedriver --detect_chromedriver_versionEnd Notes
Wish I started this as a draft when I got the notebook and started the process, so I could document every step. However, this post consolidates every major step or issue that I had.
The speed is blazing fast compared to the one that I got on the MacBook. I never imagined that I would like to code on Windows. Guess my words come back to me 🤷♂️.