R36S – Persisting game saves with GitHub repositories

I purchased an R36S portable emulator recently and, after erasing everything and installing a clean distro from scratch, my first action was to persist the game saves.

Why? Because over the years, losing save games has been one of the most frustrating experiences for me. I explored a few ways to implement cloud storage solutions—like Dropbox, Google Drive, and OneDrive—but after a while, Git repositories seemed like the best option.

A Git repository allows these small files to be stored along with their different versions over time. I don’t expect the repository to grow too large, and I don’t plan to abuse it, so I’m going to use GitHub as my remote. If it grows, I can change the remote later or adjust my strategy.

Configuring the RetroArch save folders

TThe first thing I did was change the save file directory from the individual ROM folders to the global /home/ark/.config/retroarch/saves/ instead.

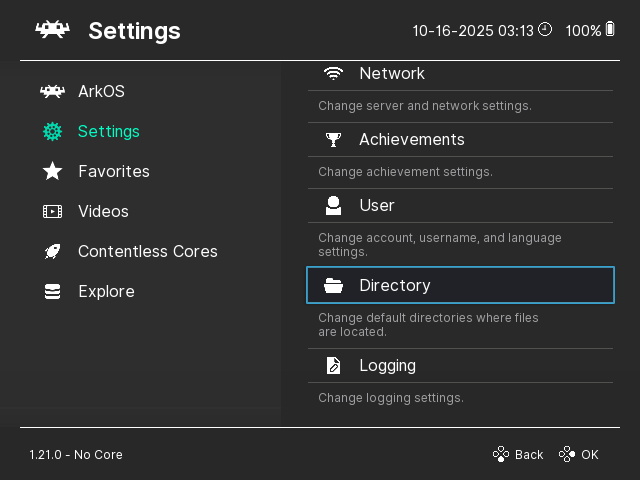
OOpen RetroArch and go to Settings > Directory > Save Files.

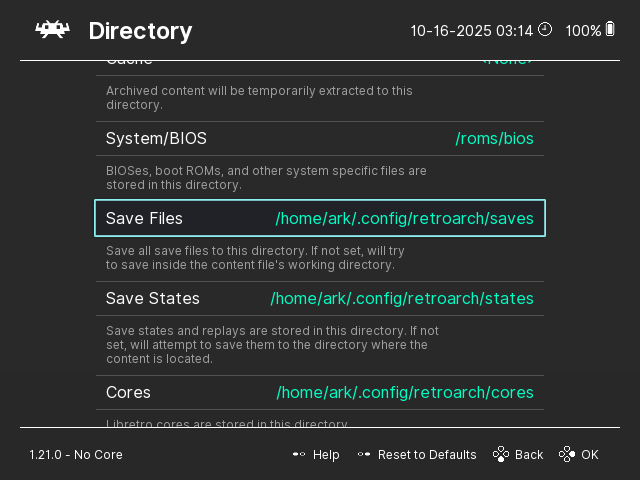
Do the same for the Save States

Don’t forget to persist your configuration file before quitting.

Then, I created two private repositories: k36-saves and k36-states.

Creating the SSH keys

After enabling Wi-Fi or LAN on your R36S, log in via SSH using your preferred method (SSH, WSL SSH, PuTTY, etc.).
In my case, I used the following command:

ssh -o PreferredAuthentications=password ark@192.168.0.12

When asked for a password, I used the default ark
Now, you can create the SSH keys:

ssh-keygen -t rsa

This creates a public/private key pair in your user’s home folder.
Copy the contents of /home/ark/.ssh/id_rsa.pub and add them to your GitHub Settings > SSH and GPG keys section.
If you have other repositories, I recommend creating a separate account since this provides full write access to your repositories.

Creating the Local Repositories

Now, let’s go to the previously mentioned saves folder and initialize the repository there:

cd /home/ark/.config/retroarch/saves/
git init
git remote add origin git@github.com:viniciusrezende/k36-saves.git
git checkout -b main

Replace the remote URL with your own repository.
Repeat the same process for the states folder.

While we’re here, let’s configure the global information for the Git user:

git config --global user.email "ark@viniciusrezende.com.br"
git config --global user.name "ArkOS k36"

Creating the Auto-Commit / Auto-Push Script

Now, let’s create the script in our home folder:

touch ~/pushgit.sh
chmod +x ~/pushgit.sh
nano ~/pushgit.sh

Then paste the following contents:

set -e
timestamp=$(date +"%Y-%m-%d %H:%M:%S")

cd /home/ark/.config/retroarch/saves
if ! git rev-parse --is-inside-work-tree >/dev/null 2>&1; then
  exit 1
fi
if [[ -n "$(git status --porcelain)" ]]; then
  echo "Changes detected. Committing..."
  git add -A
  git commit -m "Auto commit: $timestamp"
fi
git push origin main

cd /home/ark/.config/retroarch/states
if ! git rev-parse --is-inside-work-tree >/dev/null 2>&1; then
  exit 1
fi
if [[ -n "$(git status --porcelain)" ]]; then
  echo "Changes detected. Committing..."
  git add -A
  git commit -m "Auto commit: $timestamp"
fi
git push origin main

Adding the cron event

For the last step, open the crontab with crontab -e and add the following line:

*/5 * * * * bash /home/ark/pushgit.sh

Extra

While writing this, I had some issues taking screenshots from the R36S.
For anyone curious, I used the following command:


sudo ffmpeg -f kmsgrab -i - -frames:v 1 -vf "hwdownload,format=bgr0" screenshot.png

How to set up an amazing development environment on Windows

Introduction

I have been using Linux for development for a long time and MacOS for quite a few years. The only handful of times that I developed on Windows was for a small fix or adjustment.

The display of my Macbook Pro died back in September and I went back to Linux to develop. Hoping that I would have the Macbook up and running as soon as possible. The repair quotation arrived and, to my surprise, the price was way out of my reality.

I then decided to give it a try to docker-desktop since a coworker from another team had success running our development stack.

(This guide is based on guides, StackOverflow questions, and discussions all over the internet. Unintentionally I may end up forgetting to give due credit.)

Hyper.js + Oh My ZSH as Ubuntu on Windows (WSL) Terminal

(Original: https://medium.com/@ssharizal/hyper-js-oh-my-zsh-as-ubuntu-on-windows-wsl-terminal-8bf577cdbd97)

Install Windows Subsystem Linux — https://docs.microsoft.com/en-us/windows/wsl/install-win10

Install Ubuntu on Windows from Microsoft Store or any other Linux flavor — https://www.microsoft.com/en-us/p/ubuntu/9nblggh4msv6

Install Hyper.js terminal — https://hyper.is/

I went for the hyper-material-theme to set it up press Ctrl + , to bring up Hyper.js configuration file. Look for plugins: [ edit and add the theme.

plugins: [
//"hyper-dracula"
//"hyper-solarized-dark"
"hyper-material-theme"
],

Setup Hyper.js to automatically open Ubuntu on Windows

  • Open up Hyper.js configuration again and type Ctrl + ,
  • Scroll down to shell and change it to C:\\Windows\\System32\\bash.exe
// the shell to run when spawning a new session (i.e. /usr/local/bin/fish)
// if left empty, your system's login shell will be used by default
//
// Windows
// - Make sure to use a full path if the binary name doesn't work
// - Remove `--login` in shellArgs
//
// Bash on Windows
// - Example: `C:\\Windows\\System32\\bash.exe`
//
// PowerShell on Windows
// - Example: `C:\\WINDOWS\\System32\\WindowsPowerShell\\v1.0\\powershell.exe`
shell: 'C:\\Windows\\System32\\bash.exe',

Install ZSH on Ubuntu Bash Windows

  • Run this sudo apt-get install zsh
  • Open your bash profile vim~/.bashrc
  • Add this to set it to use ZSH as default:
bash -c zsh
# ~/.bashrc: executed by bash(1) for non-login shells.
# see /usr/share/doc/bash/examples/startup-files (in the package bash-doc)
# for examples# If not running interactively, don't do anything
case $- in

Install Oh My ZSH

Install Oh My Zsh with 

sh -c "$(curl -fsSL https://raw.githubusercontent.com/robbyrussell/oh-my-zsh/master/tools/install.sh)"

Restart Hyper.js and you are done!

Docker Desktop, docker-compose, and nvm

Install Docker Desktop

Follow the instructions on https://docs.docker.com/docker-for-windows/wsl/, but it is basically the usual next-next-finish.

Install docker, docker-compose, and nvm

On your terminal install both docker and docker-compose

sudo apt-get install docker docker-compose nvm

Speed things up

zsh is smart with its completions, but it may get really slow and frustrating if you let Windows concatenate its PATH with WSL’s path.

Edit your /etc/wsl.conf with the following:

[automount]
enabled = true
[interop]
appendWindowsPath = false

Besides that, make sure that you are not running docker/node on your mounted hard drive(i.e. /mnt/c/), but instead the WSL filesystem. If you need to access it, with your IDE or editor, use the \\wsl$\ network path.

Running Selenium/Webdriver tests

Install google-chrome inside WSL with your favorite PPA repository. I am not going to teach you this since there an infinity of tutorials on the subject. It may or may not work with chromium, but I didn’t test.

Install Xming/Xlaunch with the notorious next-next-finish https://sourceforge.net/projects/xming/

Create a config.xlaunch file with the following and run it afterwards:

<?xml version="1.0"?>
<XLaunch xmlns="http://www.straightrunning.com/XmingNotes" xmlns:xsi="http://www.w3.org/2001/XMLSchema-instance" <?xml version="1.0"?>
<XLaunch xmlns="http://www.straightrunning.com/XmingNotes" xmlns:xsi="http://www.w3.org/2001/XMLSchema-instance" xsi:schemaLocation="http://www.straightrunning.com/XmingNotes XLaunch.xsd" WindowMode="Windowed" ClientMode="NoClient" Display="0" Clipboard="true" ExtraParams="-ac"/>

On WSL you need to export the DISPLAY variable(I recommend you put it on your bashrc or similar):

export DISPLAY=$(grep -m 1 nameserver /etc/resolv.conf | awk '{print $2}'):0.0

You should be able to run Google Chrome by now on your terminal: google-chrome

Don’t forget to install chromedriver:

npm install -g chromedriver --detect_chromedriver_version

End Notes

Wish I started this as a draft when I got the notebook and started the process, so I could document every step. However, this post consolidates every major step or issue that I had.

The speed is blazing fast compared to the one that I got on the MacBook. I never imagined that I would like to code on Windows. Guess my words come back to me 🤷‍♂️.

Free SSL/TLS Certificates with Nginx and Let’s Encrypt

As you might have already noticed, I am now running this site with a SSL certificate provided by Let’s Encrypt. Formerly only enabled to another domain hosted here.

For those who don’t know Let’s Encrypt, it’s a free automated, and open certificate authority. You can literally have a SSL certificate on your hosting in minutes.

You can easily install it with the following instructions. Keep in mind that the instructions are for Ubuntu 14.04, so some steps may differ.

Install Let’s Encrypt client.

Download the script and make it executable:

cd /usr/local/sbin
sudo wget https://dl.eff.org/certbot-auto
sudo chmod a+x /usr/local/sbin/certbot-auto

Check your package manager for letsencrypt. Ubuntu 16.04 already have it.

Obtain the certificate.

To generate the certificate the client will create a temporary file on your webroot. You need to allow the access to the file adding the following to your nginx server block configuration:

location ~ /.well-known {
                allow all;
        }

After that, restart your nginx and run the following command:

certbot-auto certonly -a webroot --webroot-path=/var/www/yourwebroot -d yourdomain.com -d www.yourdomain.com

Don’t forget to change your webroot-path and your domain. If needed, add any other sub domain after the -d yourdomain.com. At the prompt insert your e-mail and, after read, accept the agreement.

You will end up with a set of four .pem files.

Set up nginx with SSL.

Edit your nginx configuration file again, you may now remove that .well-knowmentioned earlier. Also remove the listen 80 portion.

listen 443 ssl;
#listen 80; 
server_name www.yourdomain.com yourdomain.com; 
ssl_certificate /etc/letsencrypt/live/yourdomain.com/fullchain.pem; 
ssl_certificate_key /etc/letsencrypt/live/yourdomain.com/privkey.pem;

To redirect all your http traffic to https you should add this server block before the above:

server { 
    listen 80; 
    server_name www.yourdomain.com yourdomain.com; 
    return 301 https://$host$request_uri; 
}

Restart nginx again and test to make sure everything is working as expected.

Set up auto-renewal.

The certificate expires within 90 days, you can run the command certbot-auto renew to perform the renewal of the certificate. However, it will only renew if it’s 30 days away or less to expire. So you can create a cronjob to run every week without any problem.

Edit your crontab and insert the following entries:

30 2 * * 1 /usr/local/sbin/certbot-auto renew >> /var/log/le-renew.log
35 2 * * 1 /etc/init.d/nginx reload

A log of the output of certbot-auto renew will be available in the path shown above.

Conclusion:

Easy to install and maintain. You can also improve it using a strong encryption.